Introduction
wellioviz.js
WELLIOVIZ is a JavaScript library that provides functionality to visualize well logs, particularly those already converted to JSON, using the d3.js visualization library.
Central to wellioviz is the concept that how to plot and what to plot can be put into a JSON template that has sensible defaults, such that the end-user only has to understand what they want to change about the plotting, not the whole d3.js code.

Github Repository: https://github.com/JustinGOSSES/wellioviz
Documentation: https://justingosses.github.io/wellioviz/#introduction
Observable Notebook Demo: https://observablehq.com/@justingosses/first-wellio-example-with-all-wellioviz-functions-from-npm
Why?
Most geologists who make charts of well logs via code seem to do so in Python, often working in Jupyter notebooks. This is fine for a lot of things, but there are some use-cases where having a JavaScript visualization library makes for a better option.
-
GUIs for well correlation. Currently, there really isn't a free open-source application for well log correlation, at least to the best of my knowledge. This means if you don't have Enterprise scale money, (academics, non-profits, hobbyest, students, people in between jobs, etc.) you're often limited to correlating a handfull of wells at most using paper and pencil. Wellio (something to convert LAS files to JSON) and Wellioviz (something to visualize well logs as JSON into SVGs on a webpage) are critical pieces for a free non-code web-based well log visualization to exist. Although a full GUI (graphic user interface) is slightly out of scope for wellioviz, wellioviz could be extended to do this.
-
Websites that provide well logs to audiences on the web. Although PNG images of well logs could be created and stored on server before being sent on demand to the front-end, this is less than ideal as all the images have to be created, stored, and loaded before the user needs them. This takes a lot of storage space. Additionally, it prevents scrolling, zooming, and overlays. Visualizing the logs on the fly in JavaScript is a better option for websites that want to given users an idea what a well log contains.
-
Interactive well plotting with export into SVG or full HTML Pages from inside Jupyter Notebook Building the visualization in JavaScript also opens up the possibility of working in a Jupyter notebook and exporting wells as SVGs or full HTML webpages. Additionally, there aren't any limits on interactivity that you might hit in a python visualization package that is wrapping JavaScript behind the scenes. Kepler.gl in Jupyter is an example of this functionality where beautiful maps get created inside Jupyter notebook and get published as self-contained front-end only full HTML/CS/JS pages.
Point of Caution: To some of extent, all of these are not completely in scope of the project. Wellioviz is a visualization library. 1,2,&3 also require graphic user interfaces and other things that are better to be built as projects that utilize wellioviz.
Further Thinking...
Installation
Installation Instructions for Various Environments
Intro to node.js modules
Wellioviz is a node.js module. If you've only brought JavaScript into an HTML project via a tag, you probably want to learn a little bit about how to use npm (node package manager) to get JavaScript modules into your front-end code. This is a short demo that only covers the minimum you need to know.
Install in an Observable Notebook - JavaScript
(easiest way to get started)
To use wellioviz in a ObservableHQ.com JavaScript notebook, you can simply have a cell that says
wellioviz = require('https://bundle.run/wellioviz)
If you want to bring in a specific version, you can add the version on the end like so wellioviz = require('https://bundle.run/wellioviz@0.0.25')
You would then call wellioviz functions in other cells by adding the function name on the end of wellioviz like: example_template = wellioviz.curveBoxTemplateExamples("example")
You can find an example of this in the Hello Wellioviz" notebook on ObservableHQ.com.
Install for Use on Front-end Website
As mentionted above, if you haven't used npm modules in an HTML page before, you probably want to reach a little about them.
There is more than one way to get npm modules into a front-end project. Wellioviz doesn't have anyting about it that requires very advanced ways. For example, here and here are two different blog posts to walk you through installing a npm JavaScript module into a front-end project.
One possible way to use wellioviz in a website:
- Install node.js
- Install npm
- Navigate to the directory of your new project.
- Create a package.json file that looks like this:
{ "dependencies": { "wellioviz": "0.0.25" } }Note, the latest version of wellioviz is probably not 0.0.25 by now. Any other modules you need would go in here too after wellioviz line separated by a comma. - From the same folder that has the package.json run
npm install - Creat an HTML file at the same top-level of your project directory. Inside it, put a sript tag
<script src="node_modules/wellioviz/dist/index.js"></script>
A second possible way to use wellioviz in a website:
This way is slightly cleaner in terms of namespace. Additionally, you may not want to include your entire node modules folder if that gets big!
- Install node.js
- Install npm
- Install browserify
- Navigate to the directory of your new project.
- Run
npm install wellioviz - Create a directory called
JS. - Navigate into
JSdirectory and create a file calledmain.js. - In main.js include a line
wellio = require('wellioviz'); - If you had multiple JavaScript files, lets say called main.js, other.js and more.js, you'd now go inside the JS folder run the command
browserify main.js other.js more.js -o bundle.js - Creat an HTML file at the same top-level of your project directory. Inside it, put a sript tag
<script src="JS/bundle.js"></script>
Install Locally and Use Via Node.js backend
You're probably not going to use wellioviz on the backend. The one exception is if you wanted to create a large number of static SVGs of well logs from your LAS files.
- Install node.js
- Install npm
- Run
npm install wellioviz - To use wellioviz from the command line run
node --require wellioviz>on the next console line. - Now run
var wellio = require('wellioviz') - The console output should be
undefined, which is a bit scary, sorry. - However, if you run
wellioviz.help'I'm really no help. Please check out the docs at https://justingosses.github.io/wellioviz/ or the main README.md at https://github.com/JustinGOSSES/wellioviz. Best of luck.' - Further wellioviz functions are just the variable name you created
wellioviz+.+ function name with arguments included inside the().
Run Example Holoviews Panel/Bokeh Deployment
- Run
pip install panel - Clone/download this repository's source code
- In the command line, navigate to the
"examples/deployments/" folder - From the command line, run
panel serve example_panel_app --show
Install in a Jupyter Notebook with JavaScript Kernal
-- IN PROGRESS --
Install in a Jupyter Notebook with Python Kernal
-- IN PROGRESS --
Install Wellioviz for Contributing to Wellioviz
- Fork the repository https://github.com/JustinGOSSES/wellioviz.git on github.com to your own account.
- Clone your fork of repository that is now on your github page
git clone https://github.com/+yourUserName+/wellioviz.git - Navigate inside
cd wellioviz - Make changes
- To see Wellioviz changes appear in the demo.html page, make sure to run browserify after any changes as described in the second option for install under "Install for Use on Front-end Website".
- When you are ready to merge changes back, push the changes back to your account on github.com.
- On the repository page of your fork, you'll see a button called "new pull request" on the left side to the right of the "branch" button. Click that to start a pull request. And follow the prompts.r
Usage
Usage context
For context on usage, it is probably worthwhile to quickly check out the Architecture section and examples listed in the README.md then come back here.
WELLIOVIZ is a JavaScript library that provides functionality to visualize well logs using the d3.js version 5 visualization library.
Key Concepts on Usage
Sensible Defaults the Developer Doesn't Have to Mess With
Central to wellioviz is the concept that what to plot and how to plot it can be put into a JSON template of instructions. That template will already has sensible defaults filled in, such that the end-user only has to understand what they want to change about the plotting, not all possible changes or the d3.js code itself.
Wellioviz handles the visualization. It does not handle loading of well logs or a graphic user interface
Wellioviz doesn't have any native well log file loading capabilities. It is only visualization.
Therefore, most of the demos use something else to load the well log curves and get them into JSON. The companion library, Wellio.js, is the standard option for converting LAS 2.0 files into JSON entirely with JavaScript. However, wellioviz is built with the idea that developers will write adaptors to transform their data into the wellioviz template before passing it to the curveBox function.
One example of this is the sparse input data transformation functions Wellioviz has that are built around the idea that some people want to strip out the parts of the well log you aren't plotting and only send to Wellioviz on the front-end the minimal amount of data needed. This speeds things up by shrinking the data you need to send from a backend system to the front-end.
Installation
Check out the installation section of the docs for more information on how to get wellioviz working in different settings.
Wellioviz has some functions you will never use and a few that will be always used!
The only mandatory parts of wellioviz really are (1) the plotting JSON template given to the curveBox() function that contains information about what to plot and how to plot it and (2) the curveBox function. Everything else is optional depending on need.
Smallest Possible Sequence to Use Wellioviz
-
Load your LAS 2.0 file into memory. This will come in as a txt file converted to a string. General JavaScript functions can be used to load the file into memory. There are a couple different ways to do this depending on if the LAS 2.0 well log comes in from a file saved in the same directory as the code, a file loaded from the user's local computer into a web application, or pulled from somewhere else on the web via an API. All of these examples are shown in different Observable Demos linked to in this repositories README.md file.
-
Use wellio to convert the string of well log information into a wellio-style JSON.
well_json_01_01_095_19W4 = wellio.las2json(well_as_string) -
Supply this and the depth curve name to the next function, like so:
three_things_2 = wellioviz.fromJSONofWEllGetThingsForPlotting(well_json_01_01_095_19W4,"DEPTH") -
First though we need to get a blank template to be populated. This template holds both the data and the style for how things are visualized by wellioviz. We'll get one from wellioviz by calling:
example_template = wellioviz.curveBoxTemplateExamples("example") -
You can either use the default style options for each curve, exert a large amount of fine grain control, or style things somewhere between. In this example, we'll do something somewhere in between using the function:
wellioviz.minimumDataIntoTemplateFunc()gr_plot_template_noFill = wellioviz.minimumDataIntoTemplateFunc( example_template,well_log_curves_reformatted_for_d3_2,[uwi2],["CALI"],["black"],[""],[ {"curve_name":"GR", "fill":"no", "fill_direction":"left", "cutoffs":[0,ShaleSiltCutOff,SiltSandCutOff], "fill_colors":["gray","orange","yellow"], "curve2":"" } ], "well_holder_1A",200,400,"DEPT")resd_plot_template_1 = wellioviz.minimumDataIntoTemplateFunc(example_template,well_log_curves_reformatted_for_d3_2,[uwi2],['ILD'],["RED"],[""],[ {"curve_name":"ILD","fill":"yes","fill_direction":"left","cutoffs":[5,10,25],"fill_colors":["#ffe6e6","#ffb3b3","red"],"curve2":"ILD"}],"well_holder_1B",200,400,"DEPT")poro_plot_template_1 = wellioviz.minimumDataIntoTemplateFunc(example_template,well_log_curves_reformatted_for_d3_2,[uwi2],["NPHI","DPHI"],["purple","pink"],[""],[{ "curve_name":"NPHI", "fill":"yes", "fill_direction":"between", "cutoffs":[0], "fill_colors":["lightblue"], "curve2":"DPHI" }, { "curve_name":"DPHI", "fill":"no", "fill_direction":"left", "cutoffs":[], "fill_colors":[], "curve2":"" } ],"well_holder_1C",200,400,"DEPT") -
We'll then put each of those well log curves into a single div to hold all the curves for that well.
result_1 = wellioviz.multipleLogPlot("well_holder",[gr_plot_template_noFill,resd_plot_template_1,poro_plot_template_1])
This will create a div with several sub-divs with SVGs within them that represent the various curves in the well. They will all get appended to the div called "well_holder".
Examples of How to Use
Hello Wellioviz: Easy Way to Get Started
The absolutely quickest way to get started (no installation) is to try it out on ObservableHQ. There is a Hello Wellioviz demo that shows how to bring wellioviz into Observable and uses a small number of functions to quickly plot an example LAS 2.0 well log. You can also load your own LAS 2.0 well logs file from your computer into the browser and try it.
Observable Demo with Single Well & Multiple Well & Sparse Style Input Usage Examples
https://observablehq.com/@justingosses/first-wellio-example-with-all-wellioviz-functions-from-npm
GUI that introduces all the configurable variables in Wellioviz
-- IN PROGRESS --
Hello World Using a Well Log in LAS 2.0 & JavaScript Notebook (Wellio & Wellioviz)
-- IN PROGRESS --
Hello World Using a Well Log in LAS 2.0 & both Python (LASIO) and JavaScript (Wellio & Wellioviz)
-- IN PROGRESS --
Architecture
Basic Sketch
Different Data Inputs
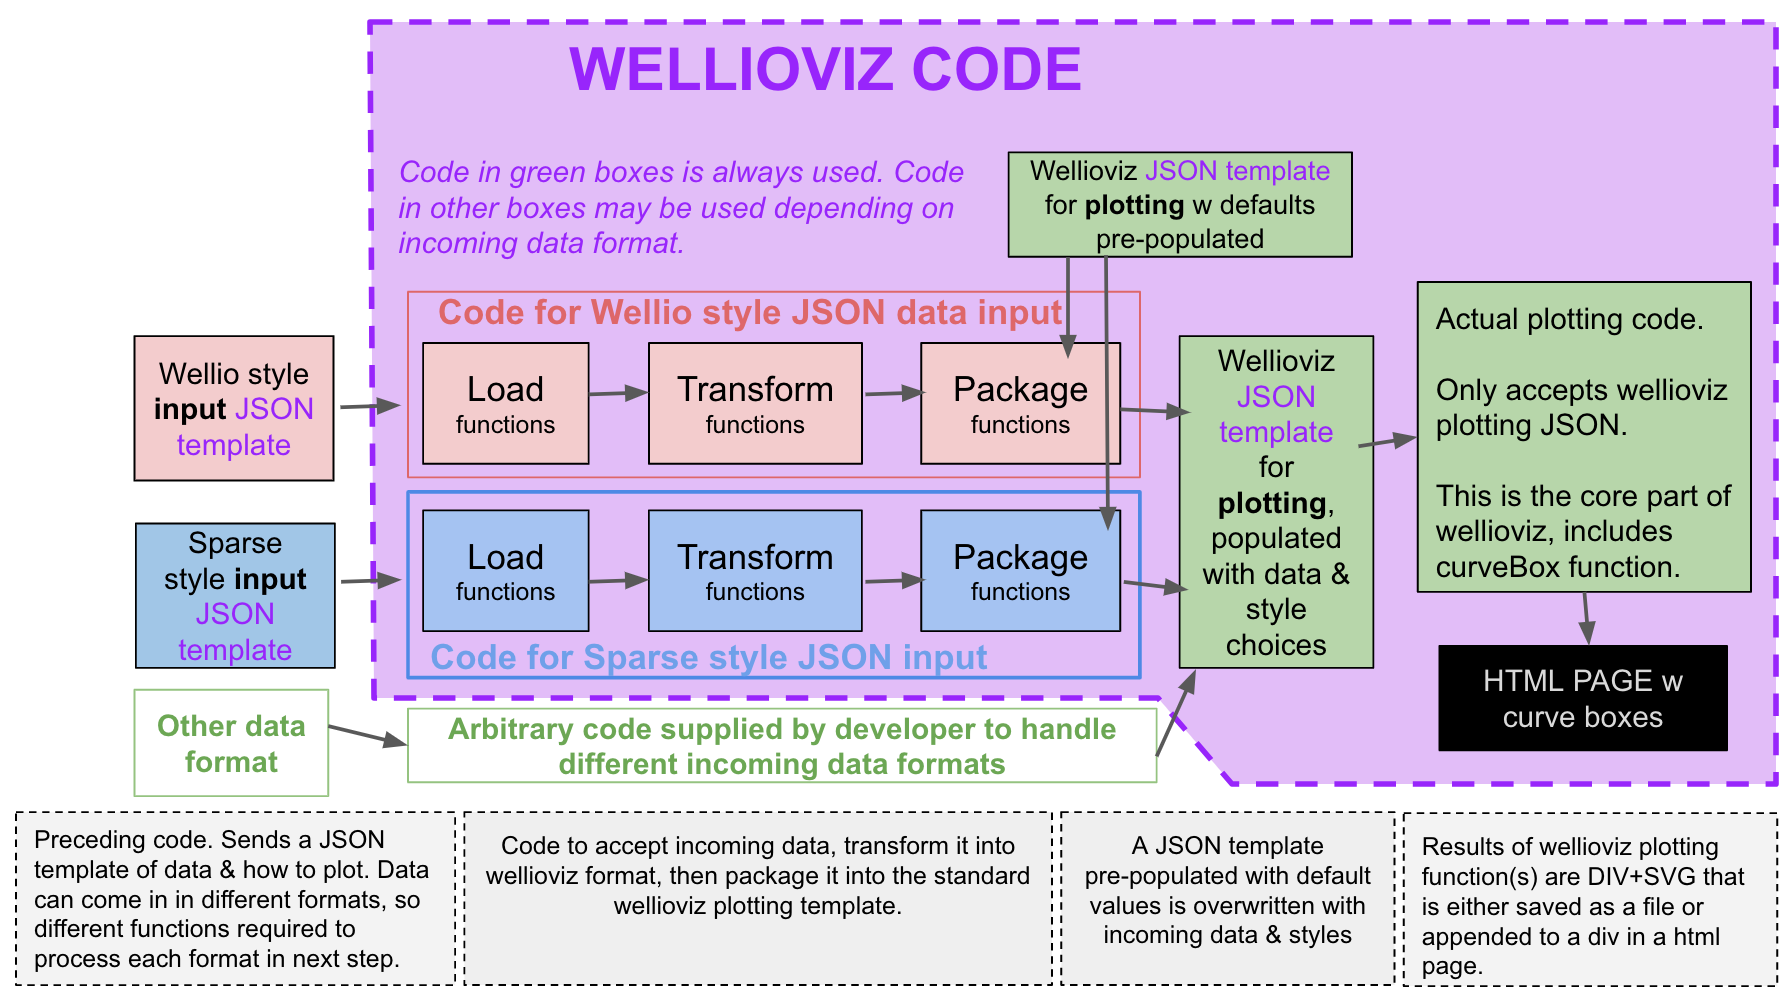
This code is written with the assumption that different users will want to bring in well log data in different formats. Code will need to transform that data into an established template format.
Some users will want to only send to the JavaScript the data they want to plot. They might want this to minimize the amount of data that has to be sent from backend server to the client's front-end website. This is referred to elsewhere in the code and documentation as the sparse incoming data approach.
Others might use wellio.js to convert a whole LAS 2.0 formatted well log file to JSON on the front-end. They would then send that whole JSON along with instructions with how to plot some portion of it to wellioviz.
Still others might want to bring in data in a format I don't know of. Ideally, it should be easy to adapt for that purpose as the plotting function takes a standard JSON. End users should be able to provide their own functions to reformat their data & style choices into the template that is fed into the curveBox function.
Code Organization:
Code is organized into 4 groups of functions:
Loading, Transformation, Packaging, & Plotting.
The further one gets through the steps, the more there is one way to do things as opposed to multiple ways.
- In the loading & transformation steps, different functions will exist as incoming data is formatted in different ways initially.
- Different functions will execute things differently in step 3 depending mostly on how things are being plotted, and no longer on the data format.
- In the fourth step, where plotting occurs, everything uses the same function, CurveBox, and potentially additional functions if more than a single well bore is shown.
Core Organization in Abstract Terms:
- Central point of organization for API is curvebox.
- Each curvebox is built from JSON template. The JSON includes information for what is plotted and how it is plotted. This will supply data, text, and styling choices for each curve box. Instead of calling d3.js code directly, inputs will be supplied via the template.
-
Organization of input information is:
- CurveBox-wide information
- Curve Information
- Top (line) information
- Rectangle information
-
Use of JSON as input to plotting functions using standard format enables:
- default values to be used most of the time and new values to be easiely substituted via template.key = something calls.
- Possible supplying of the JSON from not just JavaScript but other languages like Python. A similar organization is followed with Altair/Vega as seen in this blog post.
-
There are multiple options for combining curveboxes. This will require the JavaScript code to generate not just SVGs, but also divs that are appended to divs created by other code.
- At this time, it looks like the most flexible will be to initiate a html div with an given ID, then append SVGs to that div.
- Each curvebox is created and appended separately as a separate div.
-
Inside this main curvebox div, header information and curves within curvebox are optionally separate divs or a single SVG.
- The former enables scrolling of the curves while still seeing the header. The later enable saving the curvebox as an actual SVG file.
-
An initial CurveBox JSON template is used that has good defaults that then has limited key:value pairs replaced with new information for that specific curveBox. Things will be possible like:
-
- For single curve single well, only thing that must be changed is well-name, curveName, curve data.
-
- For multiple curve + single well + single curvebox all that absolutely needs to be changed is the same as before but two curve names and maybe fill parameter if fill is wanted.
-
- For single curve multiple wells, an array of curveNames acceptable in order or preference, multiple wellio JSON datas objects is all that is required at minimum.
-
Where to Make Changes After A Visualization is Already Plotted Once
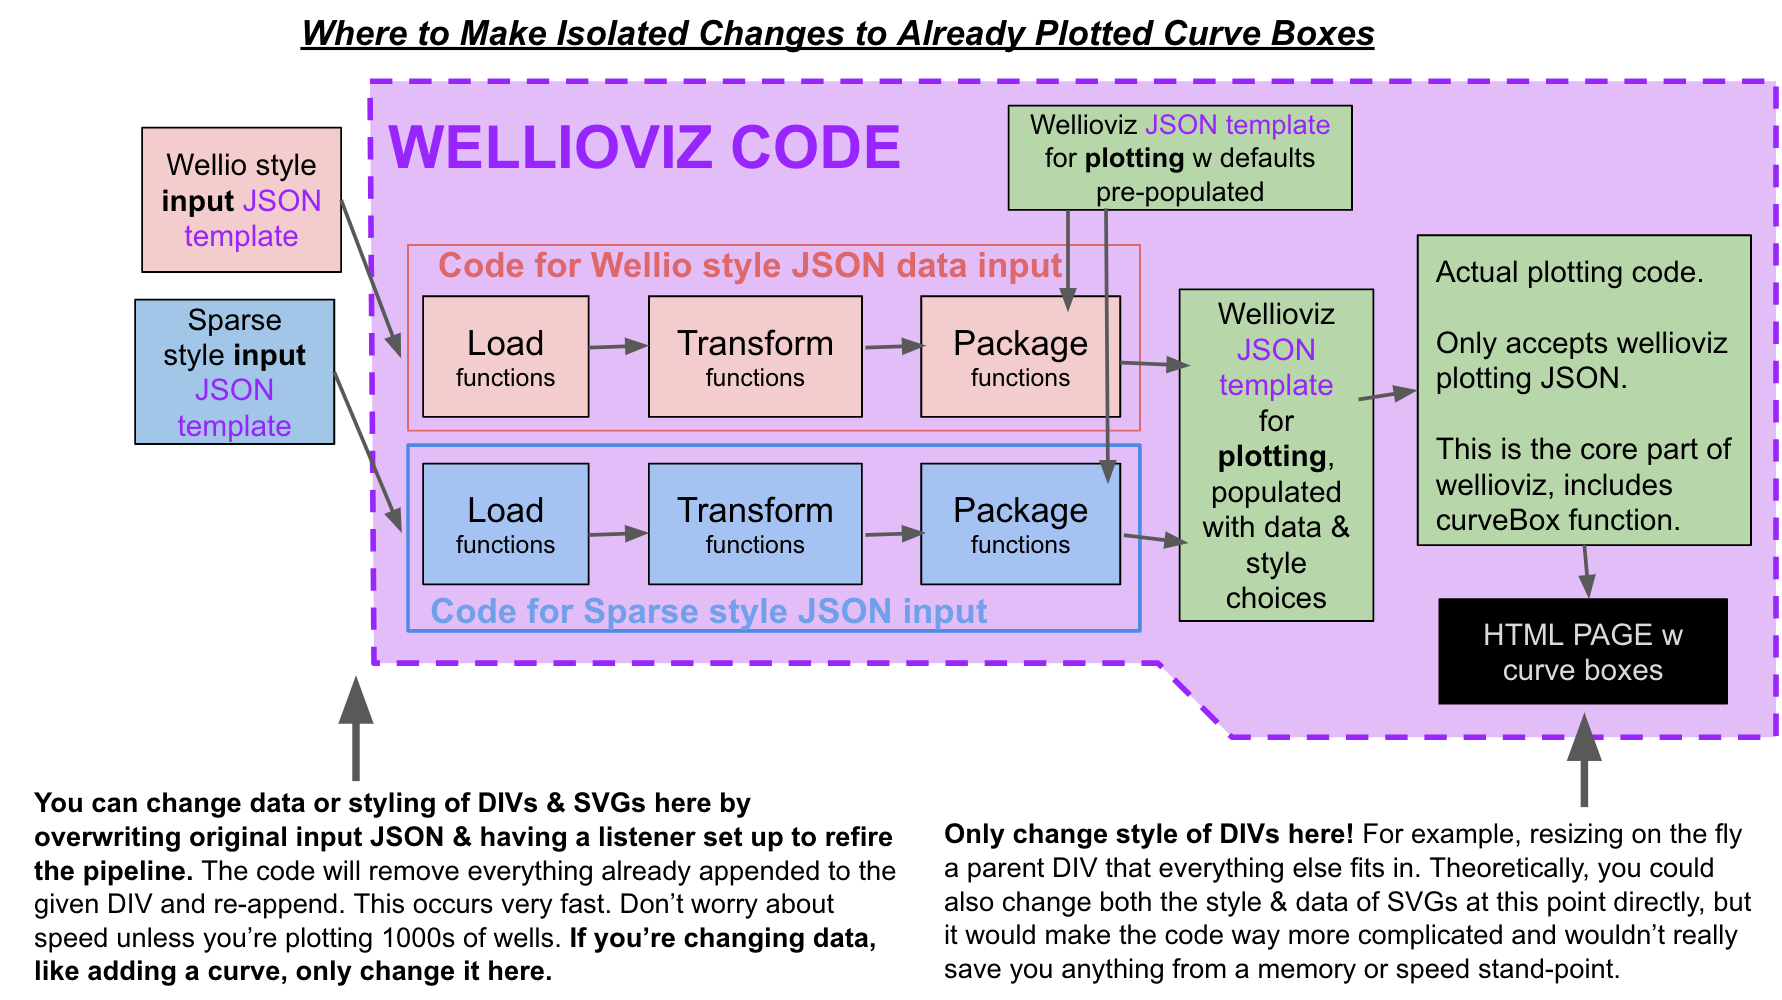
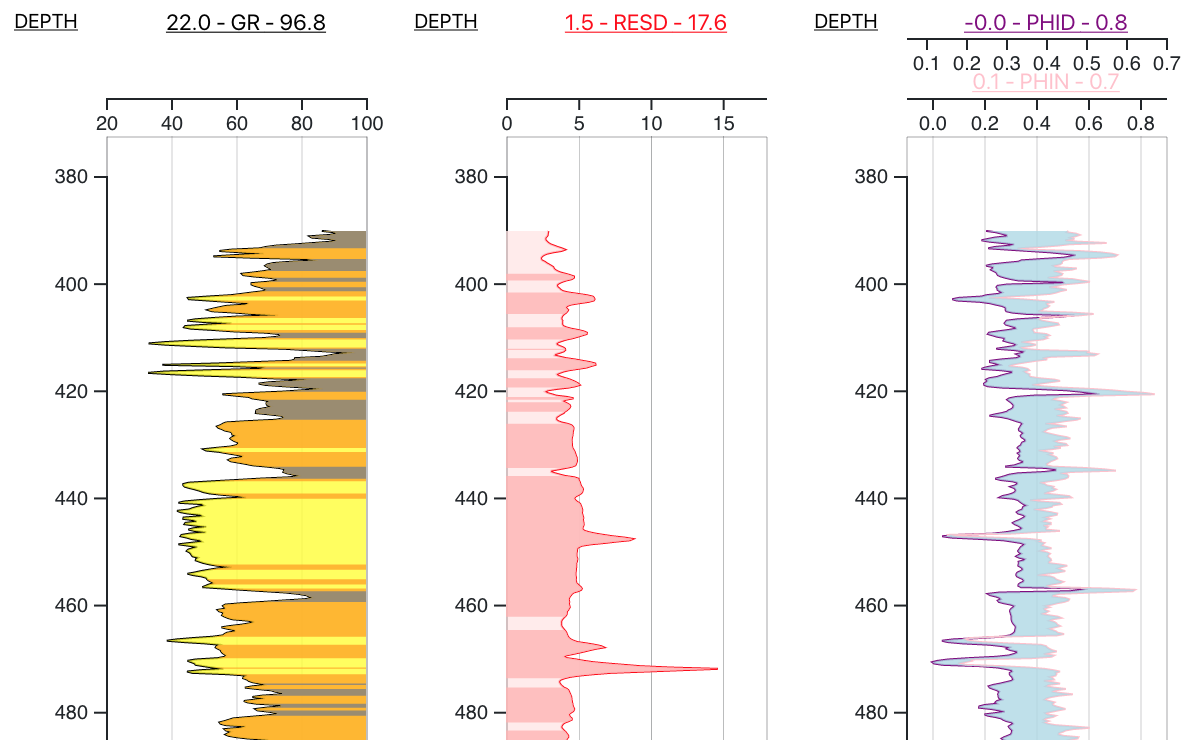
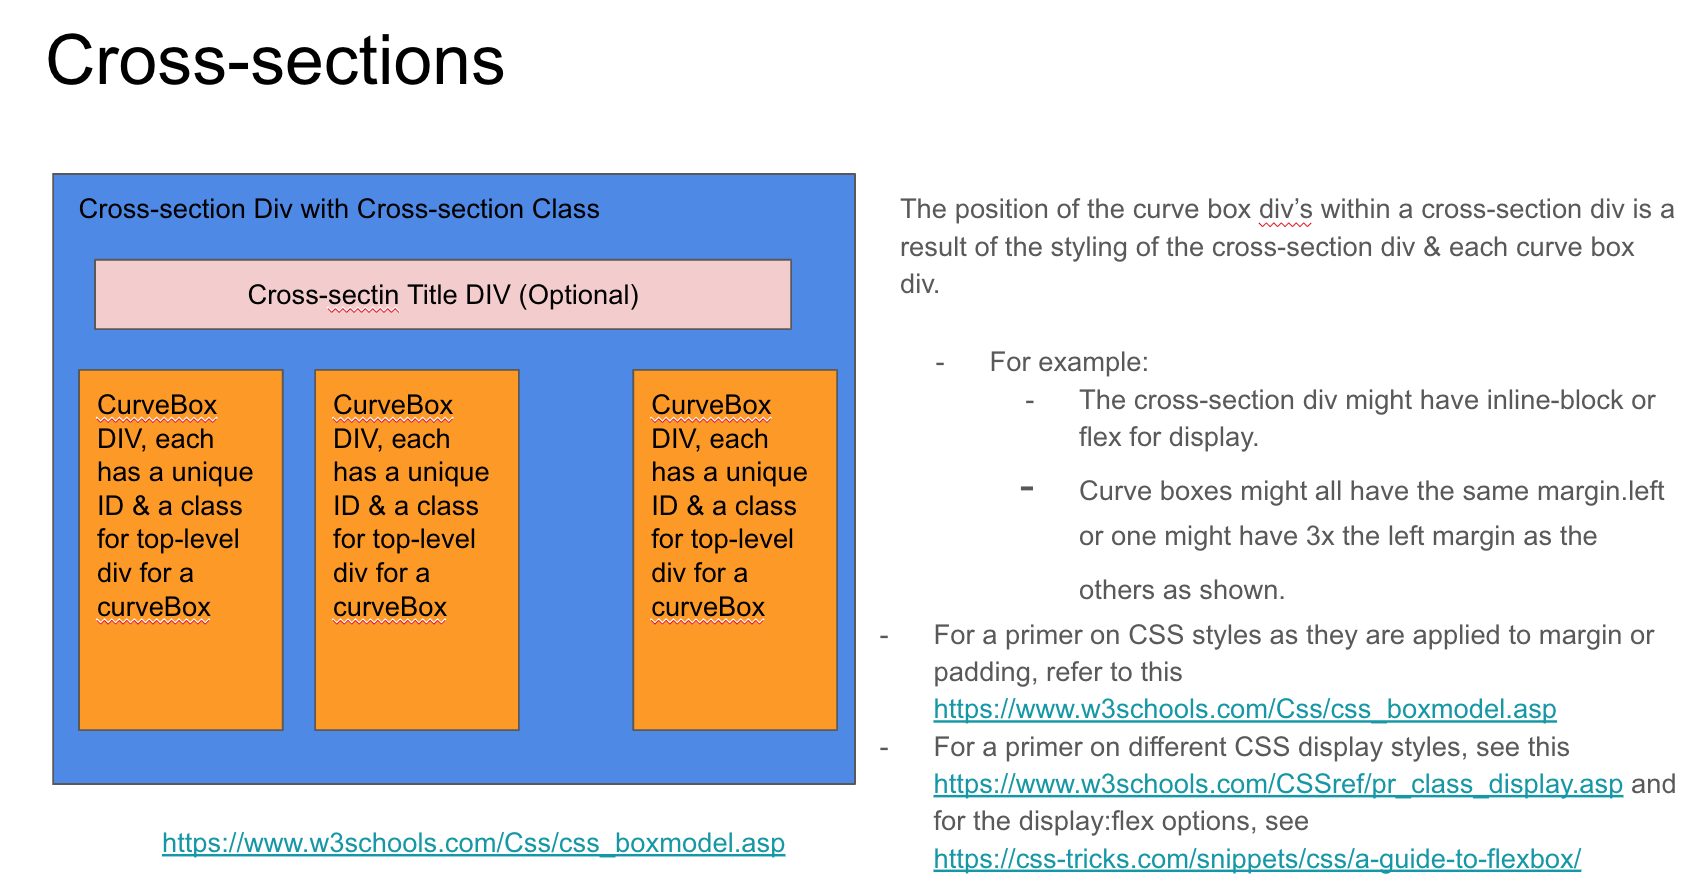
Visualization Organization
- Curvebox: The central unit of visualization. Can contain either a single Curve or multiple curves, typically from one well.
- Within CurveBox, header information is in one DIV, curves in another div. Both of these in a curvebox div. To enable scrolling the curves might have to be within a nested div.
- CurveboxHolder aka a Cross-section: Made up of multiple curveboxes. Each curvebox can represent a different well or different curves (one per box) from the same well. Typically no plotting between curveboxes but there may be for tops in cross-sections.
Organization of CurveBoxes & Cross-sections

An Initial (and outdated) List of Curvebox Visualization Visual Parts
All the visual pieces below are generated by the curveBox() function according to the explicity instructions within the plotting JSON given to the curveBox() function.
- Axis (for example ticks and integers to represent depth) (x and y)
- Axis titles (x and y)
- Curvebox Title
- Curve lines (color, stroke size, stroke style)
- Curve fill based on under or over a curve
- Curve fill multiple fill colors based on cutoffs & under or over a curve value
- Curve fill based on overlap of two curves
- Curve fill based on SVG pattern (not yet built)
- Curve fill like property but visualized as curve line color (not yet built)
- Curve units
- Curve min & max
- Curve Name
- Top lines
- Top titles
- Boxes with transparency to represent core location, formations, etc.
- Box titles
- X & Y values on hover
- Clickable curvebox with coordinates returned to other functions via click
The plotting JSON given to the curveBox() has this basic structure
-
curve_box: an object
- key:value pairs of configuration options that apply to the entire curve box.
-
components:
-
An array with one object inside with three keys: curves, lines, and rectanges.
-
curves: An array of curve objects
- Each curve object has key:value pair of configuration and data to build a single curve
-
lines: An array of line objects
- Each line object has key:value pair of configuration and data to build a single line
-
rectangles: An array of rectangle objects
- Each rectangle object has key:value pair of configuration and data to build a single rectangle
-
-
Contributing
What Type of Contributions Are Welcome?
All contributions welcome! Big, small, code, documentation, or questions.
If you’d like to contribute, but you’re not so experienced with JavaScript, look for good first issue tags or email the maintainer for suggestions.
Code of Conduct
What Issues Exist
Check the Issues for outstanding issues & features under development. There is an attempt at organizing the issues using the project board here. For the most part, the issues board contains all the issues.. just in an organization to make it clear what is being worked on now.
Ways to Contribute!
Issues, Features, and Bug Reports
Add a feature request or bug report issue here When you add an issue, there will be two choices for issues templates to use, one for bug reports and another for feature requests.
Pull Requests
If you've fixed an issue in the code, please consider submitting a pull request, which is basically a fork or branch of this repository submitted back to it with a specific change. 1. State why you are proposing this change. 2. When you make a pull request, please try to keep the changes to one feature at a time if possible (not always possible). 3. We don't have tests yet, so in lieu of that, please fork the active Observable notebook noted in the README add in your changed functions and make sure everything still works with your changes. If there are changes needed to be made to get things to work that are not in index.js but only in the Observable notebook, please note that in your pull request. This is unlikely but theoretically possible.
- Please consider other use-cases and make sure your code changes aren't narrowing the scope of wellioviz to only your use case.
- Follow the PUll REQUEST template here
Documentation
Please submit a pull request or issue for anything confusing or absent in documentation as well.
Wellioviz documentation is built with documentation.js, a library that grabs inline code documentation above each function and markdown files specified in docs/doc_setup.yml to build HTML documentation pages. You can find a live version of the docs here
How to Make the Docs
- Fork the original repository to your profile. Clone a copy locally.
- Add new markdown files to the docs by making changes to docs/doc_setup.yml or edit documentation between /** **/ in the index.js file or edit any of the markdown files specified in doc_setup.yml.
- Install locally documentation.js
- Run in the home directory of wellioviz:
documentation build ./dist/index.js --config docs/doc_setup.yml -f html -o docs - go to the docs directory. Run:
python3 -m http.server. Alternatively, if you have node.js and would like to use that you can run in your terminalhttp-server. Please note, that if you run the server from anywhere except the docs directory, the image links won't work. The docs page on the github.com repository runs from the docs folder on the master branch as well. - Go to a browser and open http://localhost:8000/index.html . You should see the docs. They'll look just like the docs mentioned above that are live as a github pages page but with your changes.
- When you're satisfied with the change, push back to your branch & then submit a pull request back to the original repository.
How to Edit & Generate Demo.html
The tricky part is probably the bundle.js script. Everything else works like vanilla JavaScript. To regenerate the bundle.js script in docs/js used in the demo.html page:
- Clone the repository locally.
.git clone https://github.com/JustinGOSSES/wellioviz.git
-
Install npm if it isn't already installed.
-
Navigate to the top folder of wellioviz if you aren't already there by running
cd wellioviz
- npm install should install all production and development dependencies in a node modules folder.The key things to be installed are browserify, wellio.js, and d3.js
npm install
- Navigate in terminal to docs/js folder. From the top folder of wellioviz, this would be
cd docs/js
- To build the demo run the line below. This will pull in wellio.js and wellioviz.js from your local node environment and combine them and the other JavaScript into a single bundle.js file that the demo.html file uses.
browserify call_plots.js main.js get_wellio.js vkbeautify.js -o bundle.js
- If you want to test that the demo built okay, you can start a server in the folder with demo.html and see it with your browser pointing at local host. If you want to use Python3 for this, it is
python3 -m http.server .
- If you prefer to use node.js, you can use the http-server module. If you started either server in your top wellioviz folder, the address to put in your browser to see the demo.html page live would be http://localhost:8000/docs/demo.html.
How I'm Keeping Things In Sync During Development.
Originally, I would develope in an Observable notebook and then move the code into dist/index.js in this repo. For this type of work, it has been a faster way to write working code.
However, now I mostly developer in VS code on the repository directly and use the demo.html page for experimentation and testing instead.
How I try develop this repository now...
- Try to make changes to the code base that address issues from the kanban board.
- Create a branch for these changes on the git repo.
- Merge the forked branch back into master.
- Make sure the demo page in the repository that uses the version of wellioviz that is in dist/index.js still works. Run other tests as appropriate.
- If it appears changs are ready to be published to npm (node package manager), I'll move up the version in the package.json file. Push that change.
- In a terminal run,
npm publish - Go to an Observable notebook that uses the latest version of wellioviz from npm to double check everything is working okay.
- Clear issues that are fixed due to the version bump.
- Merge master branch into release branch.
- These means the code in certain Observable notebooks with code developed inline in the Observable notebook cells that might be ahead or behind the published version of wellioviz.
- The code in release branch will always be in sync with code on NPM.
- The docs are mostly in sync with the actual code but that sometimes drop a little behind during very active development periods.
- The html demo page is in sync with the code in
dist/index.jsand does not pull from the published version of wellioviz on npm.
And lastly
If anything is confusing, open an issue.
ALSO - If you got here relate to the hackathon, check out the Transform2020 Hackathon notes: https://justingosses.github.io/wellioviz/#swung-hackathon
SWUNG Hackathon
Hackathon!
Plans for SWUNG Transform Hackathon 2020
Types of Sprint Issues to Pick From:
1. Tiny Issues that will have accompanying walk throughs to show new users how to make that type of change
-
Make Changes to Documentation:
- A. Improve something in the documentation that you found confusing.
- B. Add terminal examples to usuage & install sections of the documentation.
- C. Add gallery section with links to additional examples that have,are,will be created.
-
Fork an example on Observable and add in your own well log & change how it is displayed.
- ObservableHQ is like Jupyter but for JavaScript and exist online as a live, editable, reactive notebook that can be edited and forked. Learn a little about them here and in a Observable for Jupyter users.
- You can find several Observable notebook demos on the WelliovizREADME, which you can fork and then change.
- One of the first things to do is to add in your own LAS 2.0 format well logs. While the "hello wellioviz" notebook has just one way to get a well log into Observable, this notebook shows a couple different ways.
- In addition to changing the well, you can change colors, line thickness, fill colors, full cutoffs, width, heights, percent of well visible via scrolling, and a range of other configuration. The data and configuration is given to the curveBox() function in a standard format. You can see an example of that format by running wellioviz.curveBoxTemplateExamples("example") and examining the JSON returned. To see what the curveBox() function expects as values for each key, run wellioviz.curveBoxTemplateExamples("definitions").
- Observable lets you make interactive user interfaces very easily. I've built a small slide to change the cutoff values for the fill in the gammay-ray log in this Observable notebook. Do a serch to find "experimental shale/silt cutoff slider" to go right to the slider widget. This observable notebook has a great introduction to inputs and things like slider widgets. There's great little demos that could be made with widgets like this to show other interactive control of some of wellioviz's configuration options.
-
Improve the documentation!
- The documentation for wellioviz is built with documentation.js. Like most documentation tools, it works but can be frustrating. I promise it isn't as bad as using Sphinx in Python though.
- You can find some instructions for re-building the documentation after a change is made in the Contributing.md file.
- If there is anything confusiong, change it. If you think something could use more detailed instructions, change it. If you followed the instructions and dthey didn't work, submit an issue or add alternative instructions to the documentation.
2. Medium Scale Work
-
Add new variable to plotting template and main plotting function curveBox() <=== need to write instructions for this!
- Possible Idea: Add functionality such that developers can turn off the default behavior that removes any curveBox that already exists in a div when you provide that div as the place for a new curvebox. You might want to turn that off so users can add multiple curves to the same div without having to handle the multiple div creation on their side. Brief discussion in this issue.
3. Larger more complicating Issues "from the pile"
-
Issue boards:
- Prime Issue Board: https://github.com/JustinGOSSES/wellioviz/projects/1
- Userfriendliness Issue Board: https://github.com/JustinGOSSES/wellioviz/projects/2
There are a variety of issues that can be worked on for wellioviz. Some issues that are better suited for small hackathon scale springs have been tagged with either "hackathon_easy" or "hackathon_advanced".
4. Build GUIs for the visualization library
This is more of a full hackathon project. What exists currently is best demonstrated by this Observable notebook and this barebones demo webpage. What doesn't exist yet is a webpage or Observable notebook where a non-code user can play around with all the style configuration variables in the plotting template to change things like colors, fills, line widths, sizes, etc. You can see an example of what is possible in the Observable notebook where there is a slider to change the dividing line between shale & silt and silt & sand in the gamma-ray log.
Wellioviz Function Types
---- Loading, Templating, Transformation, Packaging, Plotting, Helping ## Loading Function #### (spoiler, there are none) Wellioviz assumes people are going to want to bring in data in different formats. It doesn't presuppose one format. Some people will want to load an entire well logs file to JSON and bring that in entirely on the front-end via JavaScript. Others will want to extract only the information needed on the backend and then send just that data to the front-end where it is transformed into a format wellioviz can take.If you're going to use LAS 2.0 files and don't mind loading the entire file and then converting it all to JSON on the front-end, the best way to do that is to use the wellio.js library. We're also working on a conversion between JSON from LASIO.pys to WELLIO.js style JSON.
If you're not using wellio.js, getting the data into the front-end for JavaScript is done by functions you write.s
Template functions
Functions that give you templates back
Wellioviz works with JSON templates.
These functions give you examples templates that you can simply add your data into.
- #curveBoxTemplateExamples Takes a string of either "example" or "definitions". Depending which one you provide, it either returns an example of the JSON template you'll give to curveBox() function to plot the curvebox filled out with sensible defaults or it has "definitions" of what is a valid value for each key. You might use this function to get an example template than run it as an argument with the JSON version of your well log you recently got from wellio.js and some other arguments as in the function putArrayOfLogsIntoSection().
- #getFakeIncomingSparseDataExample Is a function that returns an example of the "sparse input style" JSON that is loaded as the first step in wellioviz if you'r using the sparse input style of data ingest. You wouldn't use this at all if you're getting your LAS 2.0 files into JSON using wellio.js. Check out the architecture diagrams if this doesn't make sense.
Transformation funtions
Data is reformatted into a form that wellioviz can used.
Transformation functions for data that comes in as Wellio.js style JSON
- #convertwelljsontoobj
- #fromjsonofwellgetthingsforplotting
- #takeinarraysandgetobjectofcurvedataforplotting
Transformation functions for data that comes in as sparse style JSON
Packaging functions
Sensible defaults in a pre-packaged template that comes with wellioviz are combined with the reformatted data from the transformation step.
Plotting functions
How the data should be plotted and what data should be plotted is turned into an SVG.
Helper Functions
In addition to the 4 main groups of functions above, there are some odds and ends helper functions, mostly for getting templates and examples.
-------------
wellio
This brings in wellio.js as a dependency used by wellioviz. It returns the object that contains all its functions as a module that is called like "module.exports.wellio.[insert a wellio.js function here]"
obj:
It returns the wellio.js object and all its functions as a module.
d3
This brings in d3.js as a dependency used by wellioviz. It returns the d3.js object and all its functions as a module that is called like "module.exports.d3.[insert a d3.js function here]"
obj:
It returns the d3.js object and all its functions as a module.
help
A function that directs users to the docs if they need help.
string:
It says = I'm really no help. Please check out the docs at
https://justingosses.github.io/wellioviz/
or the main README.md at
https://github.com/JustinGOSSES/wellioviz
. \n If you would like to know what wellioviz does, try wellioviz.define(). \n If you would like to see an example template, try wellioviz.curveBoxTemplateExamples('example') \n If you would like to see an example template defintions, try wellioviz.curveBoxTemplateExamples('definitions') Best of luck.
define_wellioviz
A function that returns a short description of what the wellioviz library is all about.
string:
Returns a string that defines wellioviz.
curveBoxTemplateExamples
curveBoxTemplateExamples gives an example of the template giving to the plotting functions and definitions of the fields. A string of either "help" "example" or "definitions" is given as function argument and either a string or Object is returned depending on string provided as input parameter. This is used to help construct the JSON object that is given to the curveBox plotting function. Someone might run this function with "example" as the parameter, give back the JSON template, replace a few pieces with their own data or format choices and then pass it as the argument into the curveBox function.
(string)
A string of either "help" "example" or "definitions"
getFakeIncomingSparseDataExample
getFakeIncomingSparseDataExample is a function that takes nothing and returns a JSON of fake sparse incoming data. This is much less than the JSON wellio gives when it converts a LAS file into a JSON. This is one of the type examples of data input. It is an alternative to wellio.js style JSON. It is used next by funtion _ and .
array:
returns an array that contains an object. probably just a single object? Many of the things like max and min depth that are auto-calculated when the input is a wellio JSON and instead explicitly defined here. This saves data transmission from a backend as well as front-end calculation time.
findDepthName
findDepthName is a function that takes in a wellio style JSON representation of the well log, looks at all the curve names and finds the one that is probably the depth curve, then returns it. This is useful for not plotting the depth curve.
(object)
a full wellio style JSON
string:
returns a string representation of the curve name that is likely the depth curve. It assumes there is only one!
convertWellJSONToObj
convertWellJSONToObj is a function that takes in wellio style JSON of all LAS file well log information, array of curves names, and a string for UWI and returns the data array of objects that D3.js likes for data used in plotting.
(object)
a full wellio style JSON
(array)
array of curve names as strings
(string)
a string the represents the well name
(any)
array:
returns array of objects that contain key:value pairs of curve name and value at each depth. Depth is also a key:value pair.
fromJSONofWEllGetThingsForPlotting
fromJSONofWEllGetThingsForPlotting is a function that takes in wellio style JSON of all LAS file well log information, and returns an object that contains 3 things in an object format that are used in function ___ for plotting. the data array of objects that D3.js likes for data used in plotting.
(object)
a full wellio style JSON
(string)
String for the depth curve name
array:
returns an object of 3 things that will eventually be used in plotting. {"well_log_curves_reformatted_for_d3":well_log_curves_reformatted_for_d3,"curve_names":curve_names,"uwi":uwi}
createDepthArray
createDepthArray is a function that takes in a min float, max float, and step float value. and returns an array or depth values from the min to the max value going by the step value each step. This function is used to create a depth array for plotting when only the max, min, and depth is given explicitly in the input data. This might be done to avoid sending the depth curve from the backend to the front-end.
(float)
a float or integer that represents the top depth of an eventual array of depth values that this function creates.
(float)
a float or integer that represents the bottom depth of an array of depth values this function creates.
(float)
a float or integer that represents the interval the depth curve increases as you go from the top to the bottom of the depth curve this function creates.
array:
returns an array of depth values from the min to the max by the step. AN EXAMPLE =
[10,10.5,11,11.5,12]
takeInArraysAndGetObjectOfCurveDataForPlotting
takeInArraysAndGetObjectOfCurveDataForPlotting is a function used to reformt arrays of curve values into a form that d3.js likes better, an array of objects. THIS FUNCTION NEEDS CHANGED IT IS TOO EXPLICIT !!!!!!!
(any)
(any)
(any)
convertWellJSONToObjV2
convertWellJSONToObjV2 is a function that takes in sparse style JSON and other information and returns an array of that information properly packaged, array of curves names, and a string for UWI and returns the data array of objects that D3.js likes for data used in plotting.
(array)
An array of strings that can be parsed into floats that represents the depth along the well log curves in a curvebox.
(array)
An array of arrays of strings that can be parsed into floats that represents each of the well log curves in a curvebox.
(string)
A string for the well log UWI ID
(array)
An array of strings that represent curvenames, one for each well log curve in curve_data
array:
An array of objects properly formatted for next step ___.
putIncomingSparseJsonIntoPlottingTemplate
This function is used to put the incoming sparse style JSON information into the plotting tempalte JSON that is given to curveBox which then handles the plotting.
(object)
This is a JSON object of incoming sparse style data & plotting instructions.
(object)
This is a JSON example template of the type typically given to the curveBox function. The user will use if for defaults and replace the data and formatting options they want to change.
putArrayOfLogsIntoSection
THE FUNCTION putArrayOfLogsIntoSection NEEDS DOCUMENTATION!
(any)
(any)
(any)
(any)
(any)
(any)
(any)
(any)
(any)
(any)
minimumDataIntoTemplateFunc
minimumDataIntoTemplateFunc
(any)
(any)
(any)
(any)
(any)
(any)
(any)
(any)
(any)
(any)
(any)
curveBox
CurveBox is the central function to wellioviz in a lot of ways, not least as it holds the d3.js code. It takes a JSOn template, appends the resulting SVG to a defined DIV.
(any)
(object)
any:
SVG.node() But its main function is to append this SVG to a DIV given in the template that is the single parameter.
forMultipleCurvesMinimumDataIntoTemplateFunc
This function is used to quickly plot multiple curves as separate curveboxes and taking into consideration a list of curves to skip and some basic pre-built styles, both given as arguments.
(array)
An array of objects. Each object is a depth point with key:value pairs of curve name and value.
This was likely created by the three_things_2 function and returned like so: well_log_curves_reformatted_for_d3_2 = three_things_2
["well_log_curves_reformatted_for_d3"]
(array)
An array of strings for curve names to skip plotting.
(object)
An object that maps curve names to style and styles to
basic style config like fill color
(any)
(any)
array:
array_of_jsons_for_what_to_plot - An array of objects for each curve to be plotted in its
curvebox via the curveBox() function or another function that funnels into curvebox.
multipleLogPlot
This function is used to plot multiple curveboxes in a row. AKA makes a cross-section. It calls curveBox multiple times.
(string)
a string that represents the div ID that the multiple curveboxes will be appended to
(object)
An array of CurveBox input templates
(boolean
            = true)
is a boolean value that decides whether or not multiple plots are shown in a multiple log plot div. If show_all is false however, the developer must switch their CSS to be "inline-block" one at a time via some other means. If they don't,none will appear!
(any
            = true)
makeThisCurveBox
This function is used to plot a single curveboxe in the div listed in the plotting templates div_id key. When called it removes anything that is a child of the div listed in div_id before appending a new curveBox there.
(string)
A JSON of all the information needed to be plotted using the format of wellioviz exactly.
string:
curve_box_return - A string representation of the SVG variable called SVG. This can be fiven to the saveSvg function to save the SVG as a file with .svg ending.
saveSvg
This function is used to save a given SVG element with a given name. It creates a download link div which is then used to download the SVG file. In certain environments, this may not work for security reasons.
format_log
convertWellJSONToObj is a function that takes in wellio style JSON of all LAS file well log information, array of curves names, and a string for UWI and returns the data array of objects that D3.js likes for data used in plotting.
array:
returns array of objects that contain key:value pairs of curve name and value at each depth. Depth is also a key:value pair.